Stove Glass Replacement: A Step-by-Step DIY Guide
A cracked, shattered, or severely stained wood burner door isn’t just an eyesore—it’s a safety hazard that reduces heating efficiency. You can replace stove glass in under an hour, whether you are dealing with “crazed” glass (fine, spiderweb cracks) or a clean break.
This guide will walk you through replacing your stove glass, ensuring a proper seal, and selecting the right materials for a safe, roaring fire.
When Should You Replace Your Stove Glass?
Don’t wait for your glass to shatter, watch out for these warning signs:
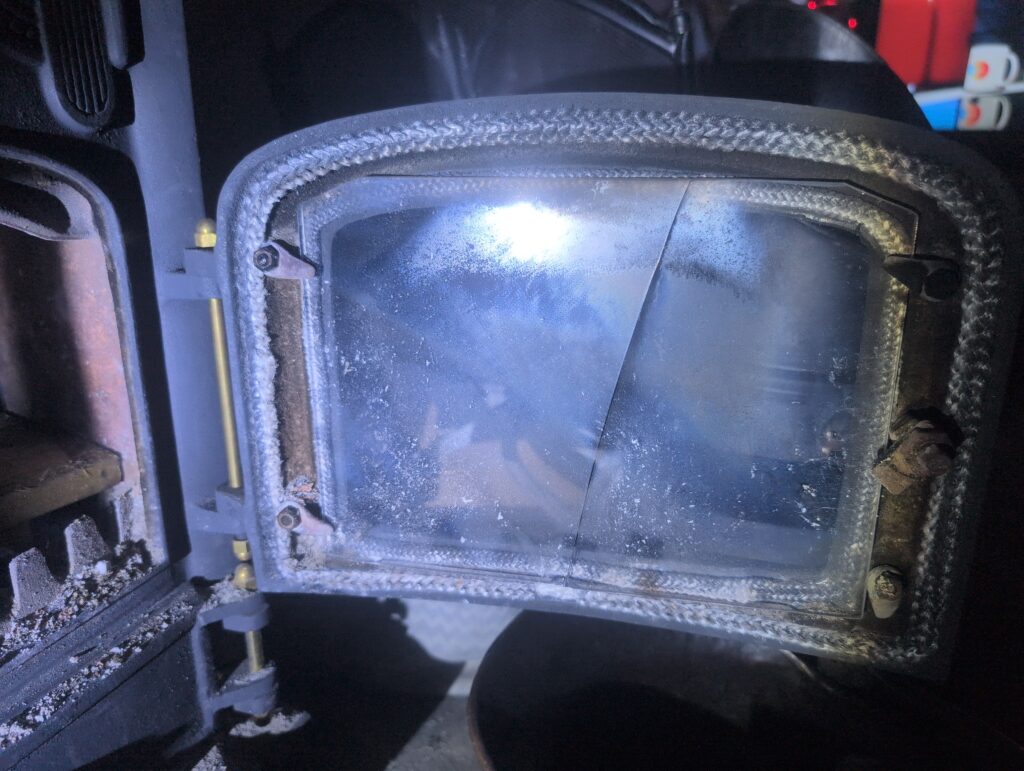
- Cracks or Chips: Caused by closing the door on a protruding log or an accidental hit with a poker.
- Permanent Discolouration: Heavy, black soot that won’t clean off, often indicating heat damage.
- Warped Glass: Prolonged overheating can distort the glass, breaking the seal.
- Damaged Seal: Replace both the seal and the glass if you find a frayed or hard rope seal.
What You Need Before You Start your Stove Glass Replacement
Before ordering, measure your glass accurately. See our extensive list of heat resistant Stove Door Glasses.
Tools & Materials List:
- Replacement Ceramic Glass
- Stove Rope/Gasket Kit (highly recommended to replace)
- Screwdriver (Phillips or flathead, depending on your clips)
- WD-40 or similar (for seized screws)
- Protective Gloves and Goggles
- Old Towel or Blanket (to protect the door)
Removing the Doors
Remove the door from your solid fuel appliance before replacing the stove glass to make the work easier. Two hinges usually hold the door in place and should have a bolt or pin through the centre. Remove this pin/bolt. As you remove the hinge, you may need to slightly lift (up) the front of the door taking the pressure off the hinge. This will make removing the pin/bolt easier.
Treating / Soaking the Glass Retaining Nuts / Bolts
Place the Stove Door(s) on a scratch proof / soft surface (old cloth or blanket) with the outside of the fire door facing downward. This leaves access to the glass and retaining bolts which hold the Glass or the Glass’s Holding bracket.
Spray / Soak (with releasing oil) the bolts/nuts which are holding in the Glass ie.. the ‘Glass Clasp’ or the ‘Glass Retaining Metal Strip’ (varies depending on stove) overnight. Soaking the bolts will reduce the risk of them shearing / snapping when removing them as they will usually be quite rusty and tight!
Do not twist off the bolts or studs. Breaking them forces you to drill out the holes, tap new threads, and use new bolts. It is important that all the bolts work correctly when re-installing the glass as this ensures a good seal between the glass and the stove fire door.
Removing the ‘old’ Glass
After removing the Glass Retaining Clasp / Strip the glass should be ready to take out.
Remove the damaged glass and old seals. We recommend that you wear some thick gardening gloves to handle the glass as the edges of the glass can be sharp and can easily cut your hand / fingers. Dispose of the glass responsibly.
Cleaning & Painting the Stove Door
Scrape or chisel off the remaining seals (which often stick to the door) and srape away any rust which has accumulated. Wire brush (or steelwool) the door area where the seal was and take off as much rust and smoothing off much as possible. (It is important that the glass can sit flush against a clean door surface – so clean well). Clean a very rusty door with a grinder and steel brush attachment.
Treat any remaining deep-rooted rust with a rust preventer to slow future corrosion. Once the door dries completely, paint or spray the back of the door and the sealing channels with a heat-resistant paint. This paint makes the inside of the door look fresh and clean when open, but more importantly, it stops rust from growing around the glass edges.
NOTE: IT IS IMPORTANT TO TOTALLY CLEAN AND TREAT THE RUST FROM THE AREA WHERE THE GLASS SITS AGAINST THE DOOR. UNEVEN SURFACES WILL CAUSE CRACKING WHEN THE FIRE TEMPERATURE IS INCREASED (AS PARTS OF THE APPLIANCE EXPAND). GLASSES CAN ALSO CRACK IN SUMMER WHEN THE FIRE IS NOT IN USE (AS THE RUST EXPANDS). DO NOT OVER TIGHTEN THE GLASS WHEN REFITTING AS THIS WILL NOT ALLOW ROOM FOR METAL EXPANSION. FINGER TIGHTEN ONLY
Replacing the NEW Glass
Most stoves use ‘Standard Heat Resistant Seals / Rope’ (looks like cord) which varies in size from 3mm to 12mm in diameter, there will be a small channel in the door for this to fit into. Other stoves (like some Parkrays) use ‘Self Adhesive Heat Resistant Ladder Rope’ which sticks around the edges of the glass (stick half on the back of the glass, lap over the edge and then on the front to provide a U shape around the edge of the glass). Read your stove’s instructions to identfy the correct Rope/ Seal required as a poorly fitting Rope will result in extra oxygen entering the appliance (between the door and glass) making it burn more rapidly and use more fuel.
When the Stove Paint is dry, refit the new Seals on the Stove Door (or to the glass if Ladder Rope Tape). There is often a channel for them to sit in. We would recommend using a SMALL amount of ‘Heat Resistant Glue’ on each corner of the door. This holds in the seals. DO NOT use glue all along the whole edge of the door / seals as this will make it difficult to remove for future Glass Replacements.
Place the new stove glass onto the door and ensure the seal fits tightly around the edges.
Grease the glass retaining bolts or studs with high-temperature grease before refitting them to ensure easy removal in the future. Tighten the bolts down evenly but do not over-tighten them as excess pressure will crack the glass when the door metal expands from the fire’s heat. Screw them to finger-tight only.
Finally, check that the seal fits perfectly around the edges of the glass and door.
Refit Stove Door
Rehang the doors on the hinges after you fit and check the glass and seals. Once you light the fire, verify that it burns correctly with no air gaps or intakes around the glass edges or door seals. Sucking in extra air forces the fire to burn too quickly and waste fuel.
Health Warning: It is important when referring to our guidelines that you work / read them in conjunction with the instruction manual for the stove. This information should not be seen as advice for your particular stove. It is just a ‘general’ guideline of how WE would change a Stove Glass in our Workshop. We recommend that you use a trained / qualified engineer to replace Stove Glasses or at least sign off your work. This information is NOT for GAS appliances.