The Baxi Brick Sets come in 2 sizes. The 16-18″ set fits both the 16″ and 18″ openings. The 20 – 24″ set fits the 20″, 22″ and 24″ openings.
Before you start it’s a good idea to take photos of the installation as it is, just as a reminder.
Remove old bricks and about 2” of the surrounding infill material, to allow you space to manoeuvre the new bricks.
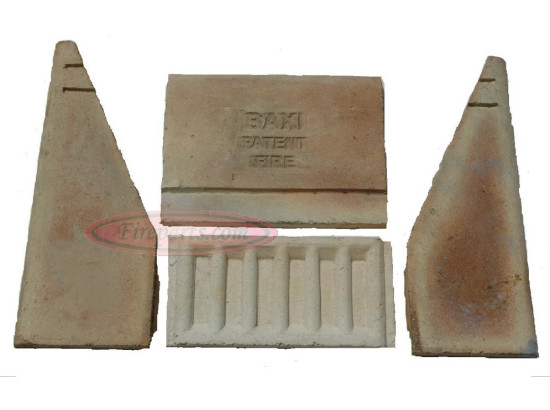
Clean off the top basket (the frame where the bricks sit). Fit the bottom back brick and the 2 side bricks, ensuring you can still remove the grate and ash pan (they interlock using the bullnose on the back of the side bricks and the grooves in the bottom back brick). Fit dry with no jointing material.
Around the back of the back brick and side bricks insert a layer (or 2) of corrugated card board, against the brick. Between the cardboard and the surrounding chamber, infill with vermiculite concrete (6 parts vermiculite to 1 part cement, with just enough water so it holds together when a handful is squeezed) Pack the space up to the top of all 3 bricks, leaving no spaces. Make sure you have a 10-15mm gap at the front edge of the side bricks. This is where they butt up to the back of the fireplace. This will enable the expansion joint to be fitted later, once set.
Here comes the tricky bit!
You may have to remove more of the surrounding infill material from the sides above the bottom brick. Because the top brick fits on top of the bottom brick and behind the side bricks, you must feed it into the space on one side to push it through the gap. Once you push it through, pull it back so it sits equally distanced behind the two side bricks. In this correct position, it should lie flat against the slope of the side bricks.
As before, you will need to insert a layer of corrugated cardboard behind the top brick, and then pack the vermiculite infill material to within about ½” of the top of the space. Fill the remaining space with a very weak 10:1 sand and cement mix to smooth off the pargetting (the slope running at about 45 degrees into the base of the chimney). You can also use this mix to fill any gaps above the bricks that you may have disturbed
*It is a good idea to try all the bricks in position dry first, before using the infill material to ensure you have knocked out enough space to manoeuvre the bricks as you don’t really want to be knocking out more rubble when you are half way through the job!
Once the concrete sets (24–48 hours), insert the rope expansion joint into the front edge of the side bricks. Use a rope with a larger diameter than the gap so you can caulk it tightly into the space. Do not point up any joints with cement or fire cement; the dry joints must act as additional expansion joints to allow the bricks to move.
Have very small fires at first to allow for things to settle slowly, the cardboard behind will burn away leaving space for expansion.
If you follow these instructions, you should easily get another 15–20 years of use out of the fire!